Macro Scheduler 15 now has native Chrome and Edge functions. You may be wondering how they work. There are a couple of sample scripts included with v15 but if you’re not sure how to get things set up or how to identify elements in the page this article is for you.
I wanted an example that wasn’t too involved but juicy enough to offer a few hurdles and demonstrate some features like xpath. I’ve set upon using Yahoo Finance to pull out the value of a stock symbol. Bear in mind that websites have a habit of changing so I can’t guarantee that the code in this article will work 6 months from now. But that shouldn’t matter much – it’s the principles of how to do this that matters most.
Before we begin make sure you are running Macro Scheduler 15.0.06 or above.
ChromeDriver
Before we can use the new Chrome functions we need to download the win32 version of ChromeDriver from: https://chromedriver.chromium.org
The zip file contains a single file: chromedriver.exe. Save this somewhere.
We need to tell the script where chromedriver.exe is. In my examples below I’ve got it in the root of drive C. So the first line of my script needs to be:
Let>CHROMEDRIVER_EXE=c:\chromedriver.exe
Start a Chrome Session
Now, we can start a Chrome session. To do this we use the ChromeStart function and give it a variable name that we want the session ID stored in. I’m using session_id. We’ll need this for the rest of the commands:
ChromeStart>session_id
Run your script and if your script is correctly pointing at ChromeDriver.exe you should see an empty Chrome window appear.
Navigating
To navigate to Yahoo add the ChromeNavigate command, passing the session_id to it:
ChromeNavigate>session_id,url,https://finance.yahoo.com/
Close the Chrome browser window (you don’t have to but running your script is going to start another) and run your script again. This time you should see it navigate to Yahoo and show something like this:

Using Developer Tools
So the first thing we need to do is get past that “I agree” button. This is where Chrome’s Developer Tools comes in to help us find the element and the attributes we can use to identify it.
Right click on the “I agree” button and select “Inspect” at the bottom of the popup menu. Chrome’s Developer Tools should appear. Usually at the bottom, but if you’ve used it before you may have changed the layout. It should appear in ‘Elements’ view and the highlighted element should be the “I agree” button:
Sometimes, I’ve found that the first time I select “Inspect”, if Developer Tools wasn’t already open, the element I want isn’t the highlighted one. Usually right clicking on the element and selecting Inspect a second time does the trick.
 Another way to identify the element once Developer Tools is already open is to click the element selector button which you see at top left in the screenshot above. Then move the mouse to the “I agree” button and click.
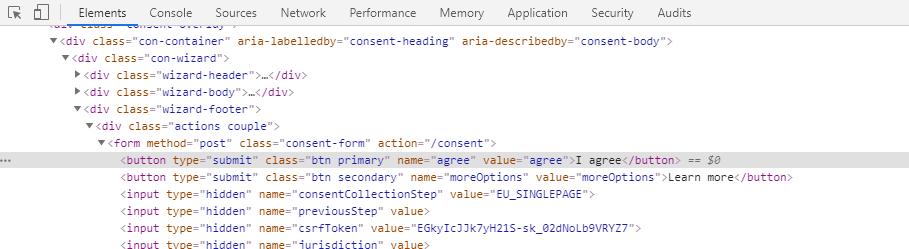
Once you’ve got the right element selected look for an attribute which we could use to identify it:
<button type="submit" class="btn primary" name="agree" value="agree">I agree</button>
Ideally we want something unique.That isn’t always possible and I’ll talk about what we can do in those cases later. Here we’re in luck. The element has a name – “agree”. We can use this to get a reference to the element so that we can then ‘click’ it:
ChromeFindElements>session_id,name,agree,agree_elements
Notice how we’re passing the session ID again (we want to make sure we’re referring to the Chrome window we started). The second parameter is the “Strategy” we want to use to identify the element. ‘Name’ is an available strategy – find the element by name. The third parameter is the strategy value. For ‘Name’ it’s the name itself which in this case is “agree”. Finally we give the command a variable name we’d like to store the located element IDs in.
Valid ‘strategies’ you can use are:
id, name, class name, css selector, link text, partial link text, tag name, xpath
Clicking on the Element
ChromeFindElements returns an array of matching elements. In this case the array should have only one item because there’s only one matching element. So the item we want is the first one: agree_elements_1.
Let’s use that to click on the button using the ChromeElementAction command:
ChromeElementAction>session_id,agree_elements_1,click
The script so far:
Let>CHROMEDRIVER_EXE=c:\chromedriver.exe

ChromeStart>session_id

ChromeNavigate>session_id,url,https://finance.yahoo.com/

ChromeFindElements>session_id,name,agree,agree_elements

ChromeElementAction>session_id,agree_elements_1,click
Close your browser window and re-run the script. Hopefully you’ll sail right through that I agree box.
ChromeDriver should wait for events to complete and pages to load before firing new events, but if you have any issues you may need to slow things down a touch. E.g. stick a Wait>1 before the click.
Sending the Stock Symbol

We now need to find that input box, enter something and submit it. Using the same ‘Identify’ technique as described above you should find that the input element has its “id” attribute set to “yfin-usr-qry”:
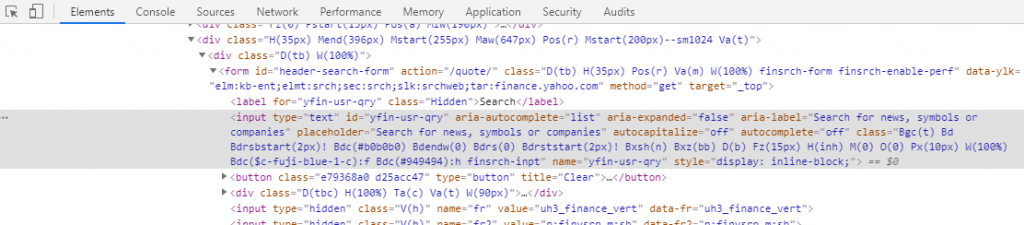
So we’ll use that:
ChromeFindElements>session_id,id,yfin-usr-qry,input_elements
I’ve used input_elements as my array name for the found elements. We now want to enter some text. Let’s search for Microsoft which is stock symbol “MSFT”. To do this we’ll use the ChromeSetElementValue command. There’s only one matching element again so as above we use the first match input_elements_1:
ChromeSetElementValue>session_id,input_elements_1,MSFT

Wait>1
Notice this time I have put a wait afterwards. The next step is to ‘submit’ the field. I found that submitting it without the wait didn’t allow enough time for the entry to ‘take’. There could be some background processing going on which needs time to finish. Remember, as with most automation, we’re automating something that was designed for a user, and Robots run faster than users, so sometimes need slowing down!
We will now use the ChromeElementAction command again, this time with the submit action:
ChromeElementAction>session_id,input_elements_1,submit
Instead of doing this we could have found the search button and issued a ‘click’ on that. But that would require another ChromeFindElements which in this case is unnecessary. We can ‘submit’ the input directly.
Extracting The Stock Value
Rerun the script and you should end up looking at the Microsoft stock info which we want to extract.
Tip: rerunning the script from the top every time isn’t ideal. We’ve got the Chrome window open so the session is still active. So what you could do if you just want to run and test a few commands is grab the session ID from the watch list and assign it with a Let statement placed just before the commands you want to test. E.g:
Let>session_id=b6976cfec0326dcce35ad3674c3ed90e

ChromeFindElements>session_id,id,yfin-usr-qry,input_elements

ChromeSetElementValue>session_id,input_elements_1,MSFT
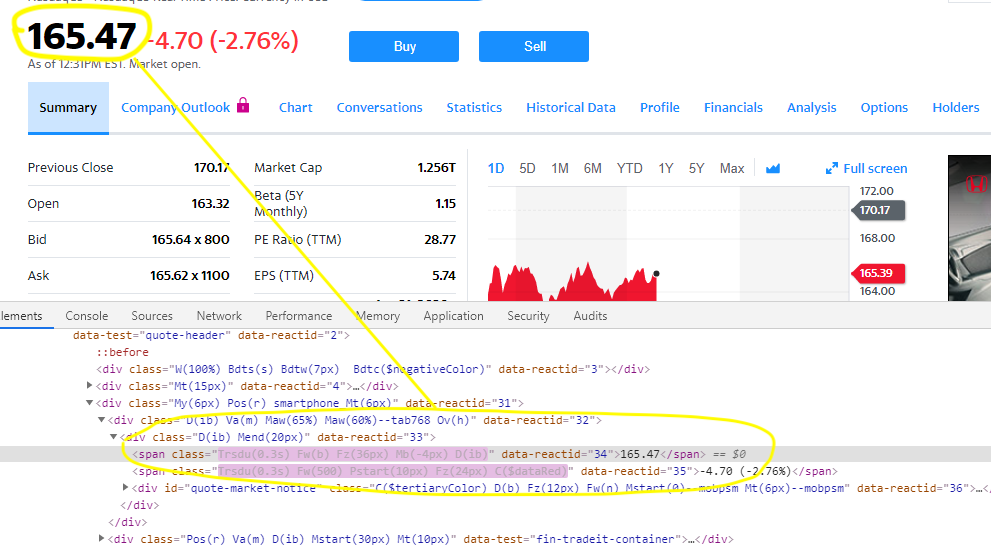
This is where things get a little more interesting. Use the inspect element tool to locate the element as above. You’ll see it’s a span element. You might also notice the class keeps changing. This site is very dynamic, updating as the stock value changes. In this instance we aren’t lucky enough to have an id, or a name. But notice those custom ‘data-reactid’ attributes. You’ll see that they all have different values, and the one we want is “34”. Let’s see if we can use that.
Now, ‘data-reactid’ is a custom attribute. It’s not standard html, and there’s no ‘strategy’ called that. So we’re going to use something called ‘xpath’. xpath is incredibly powerful and can help us find pretty much anything. There’s a great tutorial on xpath here.
We need to find a ‘span’ element with attribute data-reactid which is set to “34”. In xpath we can do this with:
//span[@data-reactid='34']
The // means find nodes regardless of where they are – we don’t need to provide a path. The @ symbol is used to specify an attribute. And we’re giving it a value. We’re saying find a span element with attribute data-reactid set to value “34” and we don’t care where it is.
So we can use this in the ChromeFindElements command as follows:
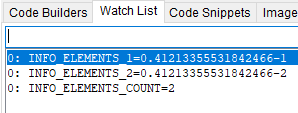
ChromeFindElements>session_id,xpath,//span[@data-reactid='34'],info_elements
Now, before we continue we should confirm whether or not this is the ONLY span tag with this attribute and value. We could do that either by searching the source using Chrome’s element inspector, or, I think easier, just debug the code to see what we get back. Stick a breakpoint just after this line, run the script and then look at the watch list. You’ll see there are two:
Now, we’re going to need to extract them to see which is the right one. We’re going to use the ChromeGetElementData command:
ChromeGetElementData>session_id,info_elements_1,text,stockValue
If you step through this command and look at the value of stockValue in the watch list, you’ll notice that info_elements_1 is not the one we want. We want the second one:
ChromeGetElementData>session_id,info_elements_2,text,stockValue

MessageModal>Value is %stockValue%
So there we have it. We’ve started Chrome, navigated to Yahoo Finance, clicked ‘I agree’, searched for MSFT and extracted the stock value. We might want to close the Chrome window at the end:
ChromeQuit>session_id
Here’s the full script:
Let>CHROMEDRIVER_EXE=c:\chromedriver.exe
ChromeStart>session_id
ChromeNavigate>session_id,url,https://finance.yahoo.com/
ChromeFindElements>session_id,name,agree,agree_elements
ChromeElementAction>session_id,agree_elements_1,click
ChromeFindElements>session_id,id,yfin-usr-qry,input_elements
ChromeSetElementValue>session_id,input_elements_1,MSFT
Wait>1
ChromeElementAction>session_id,input_elements_1,submit
Wait>1
ChromeFindElements>session_id,xpath,//span[@data-reactid='34'],info_elements
ChromeGetElementData>session_id,info_elements_2,text,stockValue
MessageModal>stockValue
ChromeQuit>session_id
Using Edge instead of Chrome?
The Edge commands work in exactly the same way as Chrome. And finding elements in Edge is done in exactly the same way. So you should be able to adapt the above code to work with Edge very easily. The main difference is that Edge is a bit more picky when it comes to installing the correct version of Edge Driver. And if you have an older ‘legacy’ version of Edge you will need to install Microsoft Web Driver instead of MS Edge Driver. The manual explains how.
Conclusion
The Chrome and Edge functions are incredibly powerful and finding elements using Chrome’s, or Edge’s, Developers Tools is quick and easy. There’s also a lot more that you can do, such as grab the entire source of the page. I hope this has been useful. Let me know in the comments below how you are using these functions.
You’ll find more info in the manual. See Chrome Functions and Edge Functions.
If you have any questions find me on the forums or drop us a line.